Free Blog Installation and Setup Service
Enter your email address below and we'll answer every question you have about blogging. We’ll even install and setup your blog for you when you’re ready to get started – completely free of charge. No catch, no strings attached.
Right – if you followed the steps in Part 1, you should now have a basic WordPress website set up on your brand new domain. Congratulations! This is the start of a beautiful relationship.
You will recall from Part 1 that I set up a site: myfirstwordpressblog.com. It’s still there for you to look at as proof of how easy the initial process is.
But now we’re moving on, so let’s get you familiarized with WordPress.
Whenever you log into your site (via http://www.yoursite.com/wp-login.php), you will first be presented with the WordPress Dashboard. It looks like this:
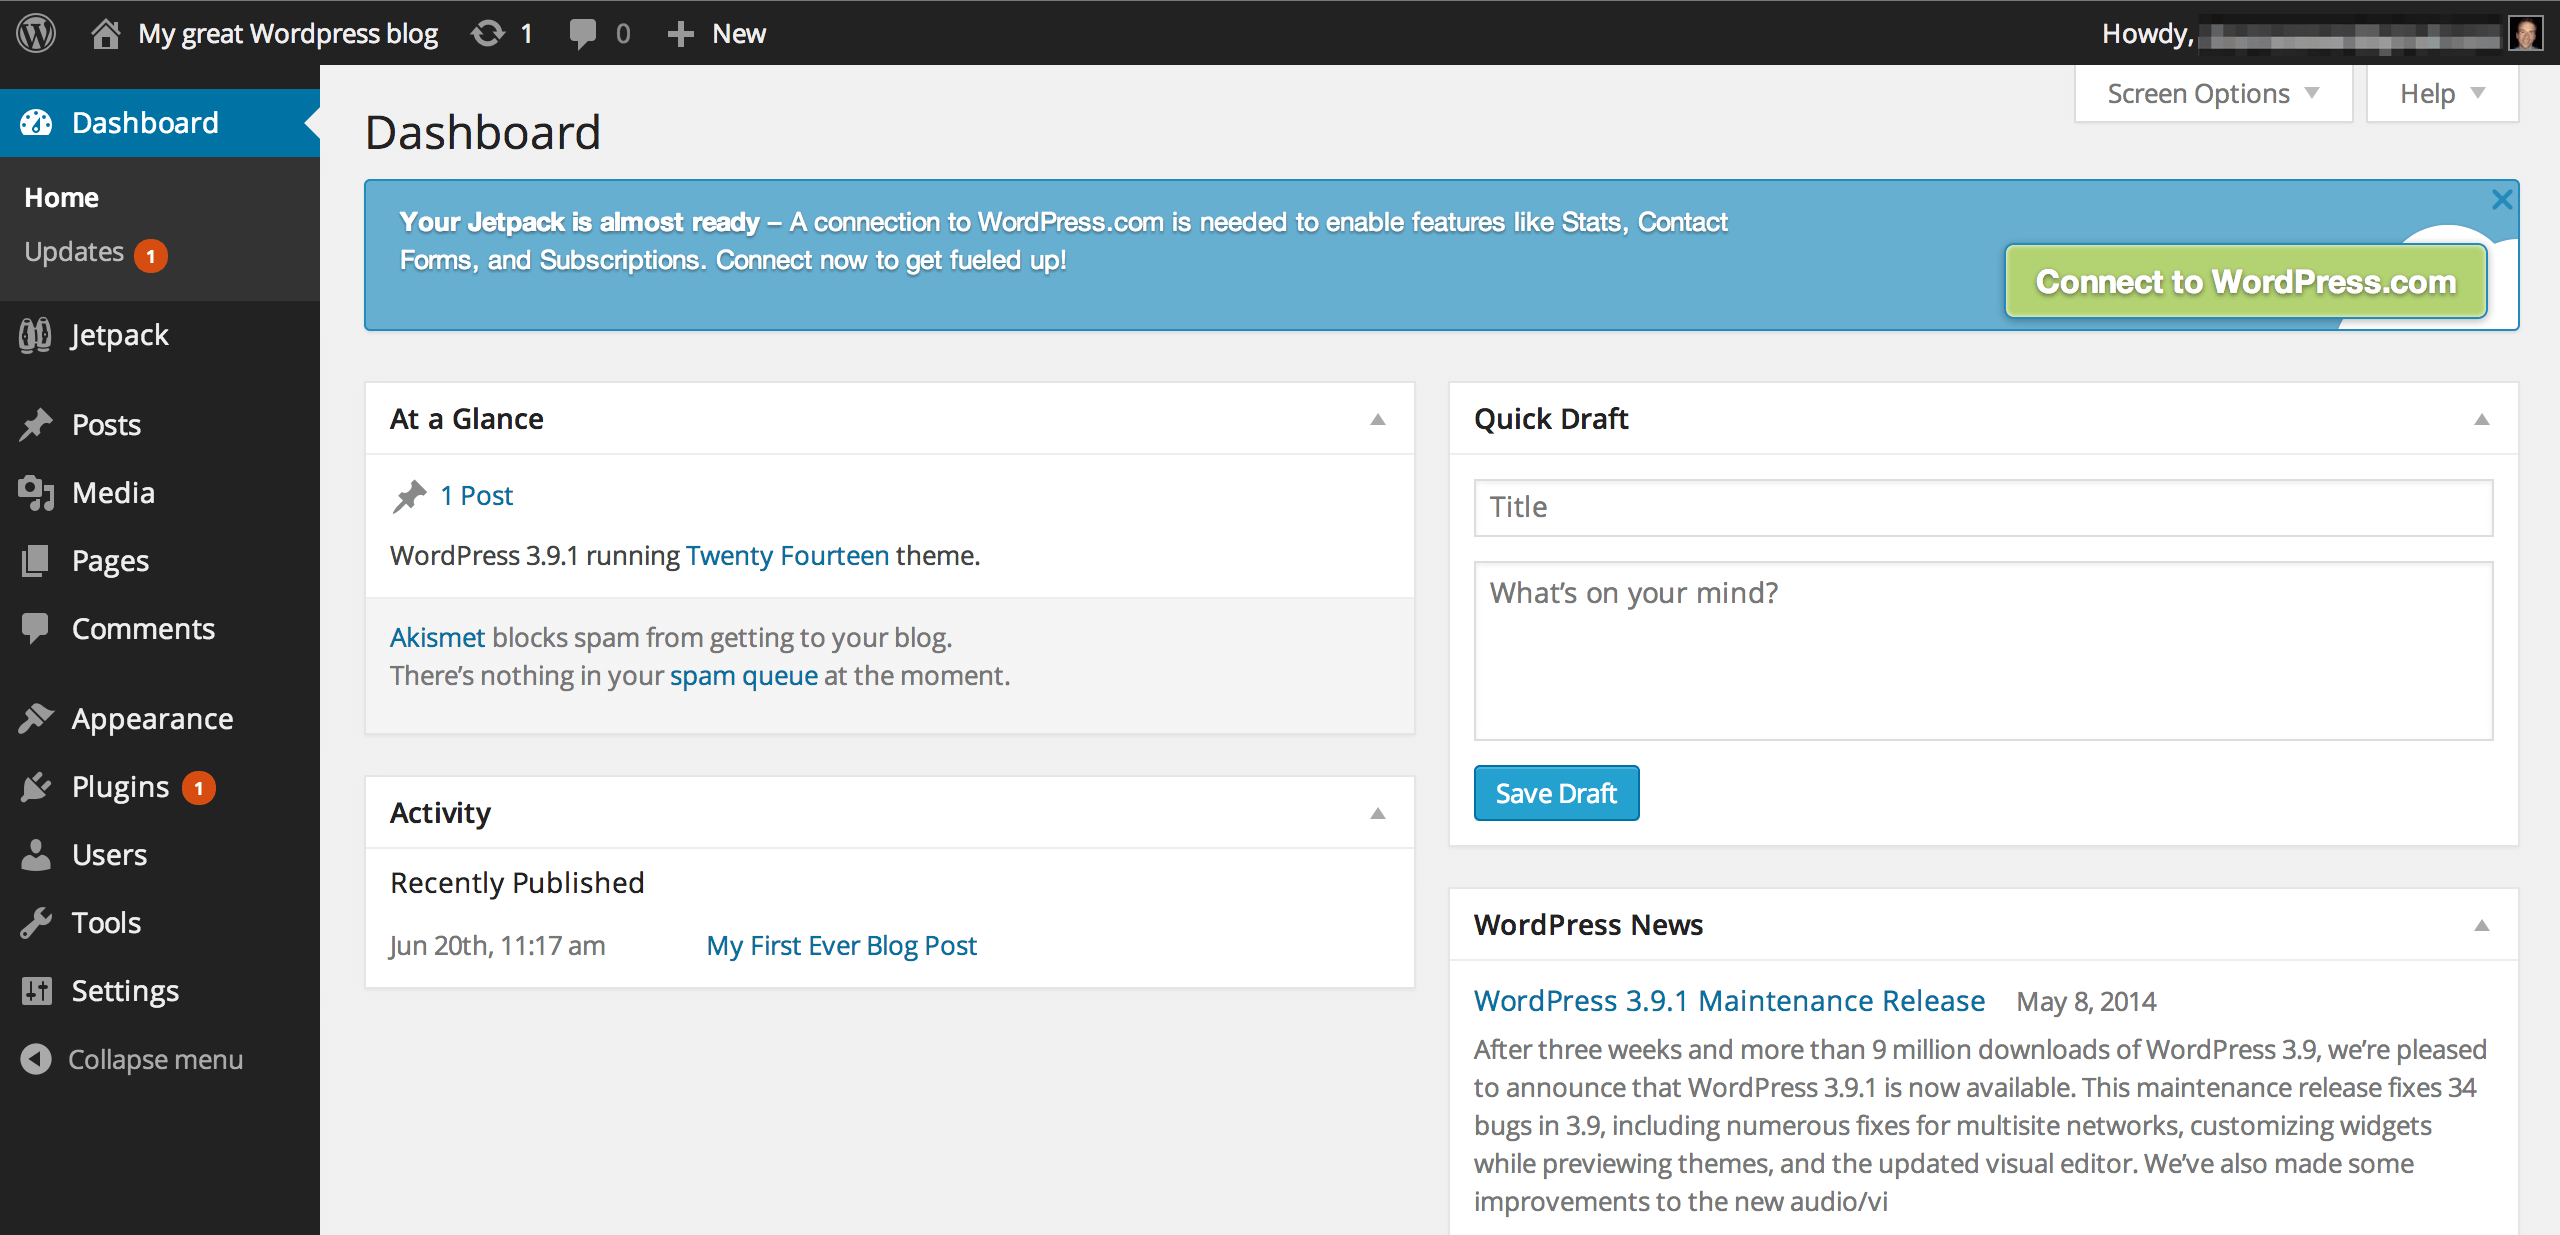
It may look overwhelming at first, but you’ll become more than comfortable with it in time, I promise.
The most important parts of the Dashboard are the Toolbar:

…and the sidebar:
These two parts of the page remain in place when you’re browsing through any part of the backend of your site, and enable you to easily move around and access all of the functions and features you need.
Now let’s take a moment to fully familiarize ourselves with the Toolbar and sidebar.
The Toolbar
The Toolbar will even stay in place if you navigate to the front end of your site.
You can verify that now by hovering over the name of your site in your Toolbar and clicking on Visit Site. You’ll see something like this:
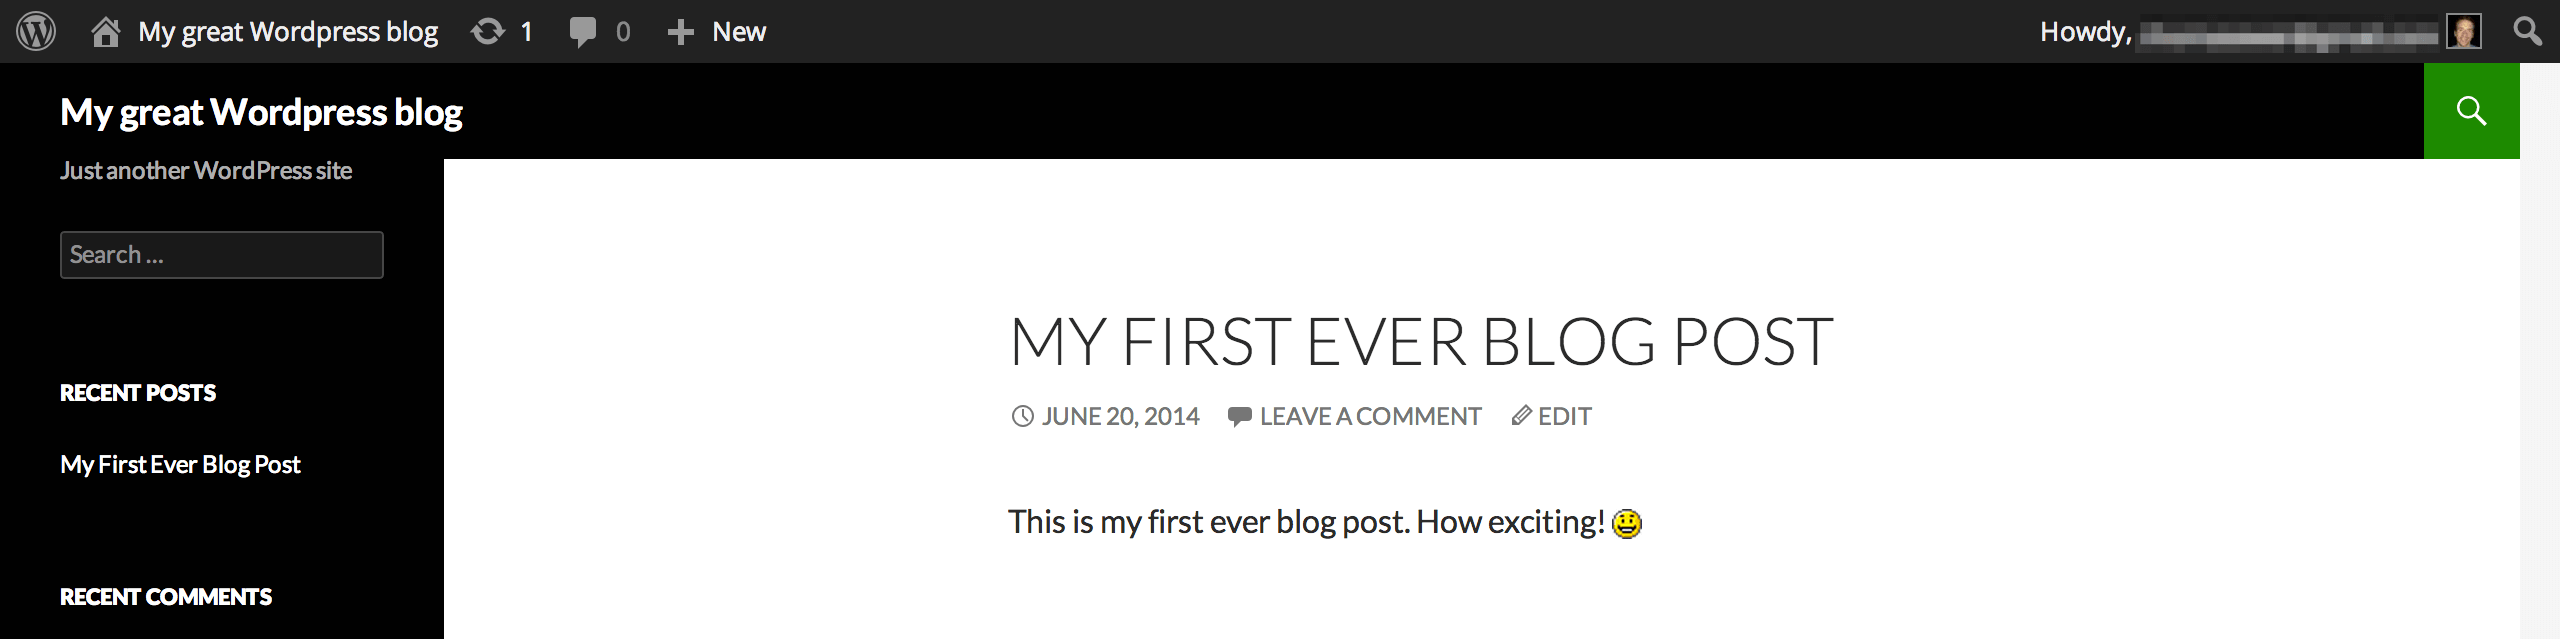
To get back to the Dashboard, just hover over the name of your site in the Toolbar and click on Dashboard.
Besides allowing you to easily switch between the front and backend of your site, the Toolbar essentially acts as a means of conveniently accessing popular parts of the WordPress backend.
You could use WordPress without the Toolbar quite easily – all of the menus and buttons only replicate what is already accessible from the sidebar. It just makes things a little easier for those features and functions you want to access quickly.
Here’s a screenshot of the Toolbar again:

From left to right the buttons are:
 About WordPress: easy access to WordPress.org, the Codex (WordPress’ online instruction manual), the free Support Forums and the Requests and Feedback Forum.
 Home: from the backend this will only offer a link to your site, but from the front end it links to many of the most popular parts of the backend (such as Themes, Widgets and Menus – all discussed later).
 Available Plugin Updates: plugins are an essential part of WordPress, and this quick notification icon tells you if there are any plugins on your site that can be updated. Clicking on the button will take you through to the WordPress Updates page, where you can choose to carry out any available updates.
 Comments: most blogs have comments enabled, and this notification icon tells you if there are any comments awaiting moderation.
 New: with this button you can create a new Post, Page or User and upload Media (such as an image file).
 MOJO Marketplace: this isn’t native to WordPress, but is packaged free if you installed WordPress through Bluehost. You don’t need to worry about it.
 Account Details: this menu gives you quick access to your WordPress user profile for the site, as well as a Log Out option.
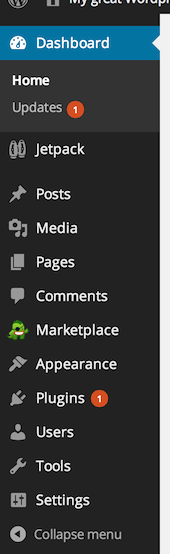
The Sidebar
There’s a lot more going on in the Sidebar, and that’s because it contains links to literally every single feature and function within WordPress. You’ll be using it a lot.
Let’s take another look at the sidebar:
From top to bottom the buttons are:
- Dashboard: provides a quick link to the Dashboard (click here if you’re ever lost!) as well as access to the WordPress Updates page.
- Jetpack: this is actually a menu for a plugin that is installed on WordPress by default. Many plugins add extra menu items to the sidebar like this, so you can easily access their functions and settings.
- Posts: this menu contains all of the relevant options for viewing, creating and editing posts and post-related meta data (such as Categories and Tags).
- Media: from this menu you can access your Media Library, upload media files to your site and edit them.
- Pages: this menu contains all of the relevant options for viewing, creating and editing pages.
- Comments: clicking on this button will take you to the Comments page, where you can moderate, edit and respond to comments on your site.
- Marketplace: this menu offers essentially the same options as the MOJO Marketplace menu in the Toolbar.
- Appearance: the various options within this menu enable you to change how your site looks and (to an extent) functions.
- Plugins: this is where you can add plugins to (and remove plugins from) your website, as well as edit plugin files (if you’re feeling especially brave – I wouldn’t recommend this to WordPress newbies!).
- Users: add, remove, edit and search for users. User Profiles are used for everything from complete website control (like your admin account) to authors (who can add content but not publish it), to spectators (who can do very little indeed), with various permission levels in-between. You don’t really need to worry about any of this while you’re getting started.
- Tools: from here you can import or export data and do a handful of other things. You may never use this menu, so don’t worry about it too much at this point.
- Settings: you guessed it – this is where you can change your sites’ Settings. We’ll be digging into site settings in Part 3.
If you’ve read through the above then you should be able to navigate around the WordPress backend with relative ease. You probably still won’t know what to do in most of the sections, but we’ll cover all of the vital parts of WordPress soon enough.